复制是 MySQL 最重要的功能之一,MySQL 集群的高可用、负载均衡和读写分离都是基于复制来实现的。
Binlog 就是实现主从复制的关键,主数据库将修改操作记录到 Binlog 中,从数据库通过解析 Binlog 实现数据的同步。
从 MySQL 5.6 起,复制有两种实现方式:基于 Binlog 、或基于 GTID。
本文主要介绍基于 Binlog 的主从复制。

大家好,我是爱分享的程序员宝妹儿,分享即学习。
本篇我们深入探讨:如何基于 Binlog 去实现 MySQL 复制。
这也是 MySQL 的重要知识点及高频面试点,宝妹儿顺便将这个题目以及答案,整理到2023版《MySQL 大厂高频面试题大全》PDF了,方便系统学习、面试通关。
宝妹儿精编的2023版《MySQL 大厂高频面试题大全》,已收录100+道真题,近30000字,长期迭代、持续更新。吃透它,应付MySQL面试没问题。
公号Java面试题宝,自取。
1. Binlog 复制是什么
在 MySQL 中,Binlog 复制是一种常见的数据库复制技术。
它允许将一个 MySQL 实例上的数据更改操作(写入、更新、删除等)复制到其它的 MySQL 实例上,从而实现数据的冗余备份、负载均衡和高可用性。
除此之外,Binlog 复制还支持一些高级功能。例如:主从切换、多级复制和并行复制等,这些功能可以提供更高的可用性、可扩展性和性能。
2. Binlog 复制的过程
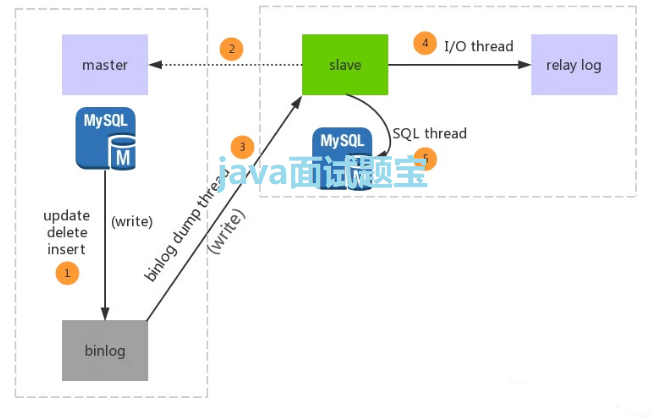
2.1 MySQL 主从复制中的主要线程
- master(Binlog dump thread)
- slave(I/O thread 、SQL thread)
- Master 的一条线程
- Slave 中的两条线程

2.2 Binlog 复制的过程
1)主服务器记录 Binlog
在主服务器上,开启了 Binlog 的功能,它将所有的数据更改操作以二进制格式记录到 Binlog 文件中。
每个 Binlog 文件都包含了一系列的事件,这些事件代表了数据库中执行的更改操作。
2)从服务器连接到主服务器
从服务器通过 MySQL 复制线程建立与主服务器的连接,这个连接通常称为复制通道。
从服务器使用主服务器的 IP 地址和端口号、用户名和密码等信息来连接主服务器。
3) 主服务器发送 Binlog 事件
一旦从服务器与主服务器建立连接,主服务器就开始将 Binlog 事件发送给从服务器。
主服务器会持续将新的Binlog事件发送给从服务器,直到从服务器告知主服务器它已经赶上了。
4) 从服务器应用 Binlog 事件
从服务器接收到 Binlog 事件后,它会按照事件的顺序将其应用于自身的数据库。
从服务器会将这些事件记录在自己的中继日志 Relay log 中,以备将来的从服务器复制。
5) 从服务器向主服务器发送确认信息
从服务器在应用 Binlog 事件后,向主服务器发送确认信息,告知主服务器它已经成功应用了这些事件。主服务器收到确认信息后,就知道从服务器已经完成了当前的复制操作。
最后,从服务器会不断地重复以上的步骤,从而实现与主服务器之间的持续复制。
主服务器记录新的 Binlog 事件,而从服务器持续地获取和应用这些事件,从而保持数据的一致性。
需要注意的是:
Binlog 复制是异步的,即从服务器不会立即应用主服务器上的每个 Binlog 事件。这意味着在复制过程中,从服务器的数据可能会略有延迟,具体取决于复制的网络延迟和从服务器的处理能力。
Binlog 主从复制的实现步骤
为了便于理解,我们结合示例一起看。
1. 配置 master
主要包括设置复制账号,并授予 REPLICATION SLAVE 权限,具体信息会存储在于 master.info 文件中,然后开启 Binlog;
MySQL> CREATE USER 'test'@'%' IDENTIFIED BY '123456';
MySQL> GRANT REPLICATION SLAVE ON *.* TO 'test'@'%';
MySQL> show variables like "log_bin";
    +---------------+-------+
    | Variable_name | Value |
    +---------------+-------+
    | log_bin       | ON    |
    +---------------+-------+
查看 master 当前 BinlogMySQL 状态:
MySQL> show master status;
+------------------+----------+--------------+------------------+-------------------+
| File             | Position | Binlog_Do_DB | Binlog_Ignore_DB | Executed_Gtid_Set |
+------------------+----------+--------------+------------------+-------------------+
| MySQL-bin.000003 |      120 |              |                  |                   |
+------------------+----------+--------------+------------------+-------------------+
建表插入数据:
    CREATE TABLE `tb_person` (
	   `id` int(11) NOT NULL AUTO_INCREMENT,
       `name` varchar(36) NOT NULL,
       `address` varchar(36) NOT NULL DEFAULT '',
       `sex` varchar(12) NOT NULL DEFAULT 'Man' ,
	   `other` varchar(256) NOT NULL ,
       PRIMARY KEY (`id`)
     ) ENGINE=InnoDB AUTO_INCREMENT=0 DEFAULT CHARSET=utf8;

	 insert into tb_person  set name="name1", address="beijing", sex="man", other="nothing";
	 insert into tb_person  set name="name2", address="beijing", sex="man", other="nothing";
	 insert into tb_person  set name="name3", address="beijing", sex="man", other="nothing";
	 insert into tb_person  set name="name4", address="beijing", sex="man", other="nothing";
2. 配置 slave
Slave 需额外设置 relay_log 参数,slave 没有必要开启二进制日志。
如果 slave 为其它 slave 的 master,就要设置 bin_log。
3. 连接 master
MySQL> CHANGE MASTER TO
         MASTER_HOST='10.108.111.14',
         MASTER_USER='test',
         MASTER_PASSWORD='123456',
         MASTER_LOG_FILE='MySQL-bin.000003',
         MASTER_LOG_POS=120;
4. show slave status;
MySQL> show slave status\G
       *************************** 1. row ***************************
                      Slave_IO_State:   ---------------------------- slave io状态,表示还未启动
                         Master_Host: 10.108.111.14
                         Master_User: test
                         Master_Port: 20126
                       Connect_Retry: 60   ------------------------- master宕机或连接丢失从服务器线程重新尝试连接主服务器之前睡眠时间
                     Master_Log_File: MySQL-bin.000003  ------------ 当前读取master Binlog文件
                 Read_Master_Log_Pos: 120  ------------------------- slave读取master Binlog文件位置
                      Relay_Log_File: relay-bin.000001  ------------ 回放Binlog
                       Relay_Log_Pos: 4   -------------------------- 回放relay log位置
               Relay_Master_Log_File: MySQL-bin.000003  ------------ 回放log对应maser Binlog文件
                    Slave_IO_Running: No
                   Slave_SQL_Running: No
                 Exec_Master_Log_Pos: 0  --------------------------- 相对于master从库的sql线程执行到的位置
               Seconds_Behind_Master: NULL
       Slave_IO_State, Slave_IO_Running, 和Slave_SQL_Running为NO说明slave还没有开始复制过程。
启动复制:
start slave
查看 slave 状态:
MySQL> show slave status\G
       *************************** 1. row ***************************
                      Slave_IO_State: Waiting for master to send event -- 等待master新的event
                         Master_Host: 10.108.111.14
                         Master_User: test
                         Master_Port: 20126
                       Connect_Retry: 60
                     Master_Log_File: MySQL-bin.000003
                 Read_Master_Log_Pos: 3469  ---------------------------- 3469  等于Exec_Master_Log_Pos,已完成回放
                      Relay_Log_File: relay-bin.000002                    ||
                       Relay_Log_Pos: 1423                                ||
               Relay_Master_Log_File: MySQL-bin.000003                    ||
                    Slave_IO_Running: Yes                                 ||
                   Slave_SQL_Running: Yes                                 ||
                 Exec_Master_Log_Pos: 3469  -----------------------------3469  等于slave读取master Binlog位置,已完成回放
               Seconds_Behind_Master: 0
如上,slave 的 I/O 和 SQL 线程都已经开始运行,并且Seconds_Behind_Master=0. Relay_Log_Pos 增加,意味着一些事件被获取并执行了。
那么,怎样去判断 SLAVE 的延迟情况?slave 是否追上 master 的 Binlog 呢?
参考思路:
首先,查看下 Relay_Master_Log_File 和 Maser_Log_File 是否有差异。
- 如果 Relay_Master_Log_File 和 Master_Log_File 一样,再来查看下 Exec_Master_Log_Pos 和 Read_Master_Log_Pos 的差异,对比 SQL 线程比 IO 线程慢了多少个 Binlog 事件。
- 如果 Relay_Master_Log_File 和 Master_Log_File 不一样,延迟的可能就比较大了,可从 MASTER 上取得 Binlog status,判断当前的 Binlog 和 MASTER 上的差距。
以上都不能发现问题,我们还可以使用 pt_heartbeat 工具来监控主备复制的延迟。
5. 查询 slave 数据,主从一致
MySQL> select * from tb_person;
     +----+-------+---------+-----+---------+
     | id | name  | address | sex | other   |
     +----+-------+---------+-----+---------+
     |  5 | name4 | beijing | man | nothing |
     |  6 | name2 | beijing | man | nothing |
     |  7 | name1 | beijing | man | nothing |
     |  8 | name3 | beijing | man | nothing |
     +----+-------+---------+-----+---------+
总结
通过本文及示例,我们了解并掌握了基于 Binlog 实现 MySQL 主从复制的5个核心步骤。
主从复制有很多不同的复制策略,不同的复制策略,对不同的场景的适应性也是不同的,关于其他复制策略后续再更文补充。
分享即学习,我是爱分享的程序员宝妹儿。
如果觉得有用,请顺手【点赞】支持下哦,这将是对宝妹儿的最大鼓励,谢谢~
最后
本文收录于宝妹儿精编的 2023版《MySQL 大厂高频面试题大全》PDF。
搞定这100道题,足以应对MySQL面试。


[…] 上一篇介绍了:Binlog实现MySQL主从复制 […]